Showing posts with label bag. Show all posts

Saturday, December 17, 2011

Space Invaders Clutch Purse

Latest project: a Space Invaders clutch purse.

the front...
...and the back.

I talked about this before in my interfacing post, but I was trying a few new things with this bag. First, I tried really hard to line up/match the fabric. That was actually pretty easy - I just had to strategically place my pattern pieces before cutting them out. The sew-on interfacing made things a little more difficult, though. The fabric felt stiff, but there actually was a lot of movement in the center of the fabric (away from the stitches) that I didn't take into account, so things got slightly off on the back. I feel like fusible interfacing would help solve that, provided you make sure the fabric is straight before fusing.

The different types of fabric were interesting. I do like corduroy... I see why my sister is always using it in her bags. But it didn't occur to me that the texture and thickness would cause the fabric to pull slightly as it passed under the presser foot, so my corduroy band on the front is slightly diagonal.

The front band is also supposed to have a bow on the right side, but I got lazy and didn't feel like hand sewing on a bow. (It was also going to be in black corduroy.) I think the clutch could use something on the band... maybe not a bow, but a corduroy space creature? Or a cross stitch medallion?

I liked using lining fabric. I did not hand stitch the lining fabric closed, so there is a very big and visible machine seam on the bottom of the bag. Laziness. The lining also seems too big for the interior... maybe I'm missing something in the pattern (like sewing larger seam allowances for the lining?) but this always seems to happen to me. My goal for the next bag I sew is to improve the lining - both in the fit and the seam.

I used a lot of hardware on this bag too. It called for a magnetic clasp, which was super easy to install, a ring and a wrist band. I had the hardest time finding the fixture to attach the wrist strap, and when I finally found a store that carried them the only color they had was a dirty bronze, not silver like the rest of the hardware. Note to self for next time: find all the supplies before sewing. Do I really need a wristband? (Especially an overly large one that can probably fit three or four wrists?) I might cannibalize it for another project.


Overall verdict for the bag: I love the fabric. The form is a little clunky. It seems like it either needs much more structure or much less, but I think that's largely because of the materials (namely, cotton fabric) I used. Not sure if I would use this pattern again, but it's cute.

Friday, December 2, 2011

Interfacing

I seem to be on a video games bag kick. My latest project: a Space Invaders clutch purse. It's currently a work in progress because I'm having some trouble acquiring the hardware I need for the wrist strap.

I love sewing. I can't stop. I keep inventing more things for myself to sew. Hopefully I'll be able to make a trip up to Berkeley one of these days so I can get some fabric for a dress and some pillow fabric for my couch, instead of coming up with not as useful projects. I know I've said this before, but I find pattern construction so interesting. I love seeing how everything is laid out and assembled to hide the seams and make the finished project.

Some new things I'm tackling with this bag:
  • Using different types of fabric. This pattern actually called for satin, but I went with cotton and corduroy. The bag is lined with "lining fabric" too.
  • Aligning the pattern. The Space Invaders print has very clear lines, and I wanted to try matching them up as much as possible, at least on corresponding pieces. So I'm making the front and back of the bag match, and the front and back of the flap match.
  • A different type of closure. Here, it's a magnetic circle closure.
  • Interfacing! I'm using two different types of interfacing in this bag. So I decided to write a little bit about what I discovered.
Because the pattern was designed for satin, it calls for sewable interfacing. I really wanted to give sewable a try, despite the fact I switched to cotton fabric. However, I either didn't read the measurements correctly or didn't think before cutting and only had enough to reinforce 3 out of the four pieces of my pattern. Oops. I used fusible for the 4th piece. But, I made that piece the underside of the flap in case it turned out bubbly and wrinkly.

I pressed the hell out of that piece. I went with advice I read in a blog and used a damp cloth and a dry iron. I pressed the iron down hard on the cloth over my piece and kept it there until the cloth was dry. Then I moved on to the next spot, until the whole cloth was dry. I waited until my fabric was cool, then flipped it over and pressed the other side with the steam setting on my iron.

It actually turned out well-- no bubbles! I guess my problem with those other projects was just impatience. Looking at both sides of the flap, you can't really tell the difference between the two types of interfacing. However, on the other parts of the clutch which have sewable, there is a lot more movement in the fabric. I guess that makes sense because the interfacing is only attached along the edges of each piece. I can see how you might use each interfacing in different contexts. I don't really have pictures because you can't see the difference - it's more of a feel. In the future, if I make more of these, I'm definitely going with a stiffer interfacing (the clutch is a little floppy), and will probably stick with fusible if the fabric will support it.

Saturday, November 26, 2011

Sewing Tote Bag

This tote bag was the first sewing project I ever attempted on my own. I finally finished it this weekend, oh.... 2 years after I started it.


My first sewing machine was a semi-functioning tension-problem-ridden Singer I acquired off freecycle. Recieving it gave me an excuse to take Stonemountain and Daughter's Intro Sewing class, in which I made a horribly ill-fitting flannel robe (the fault of a unisex beginner's pattern - it wasn't me, I swear). The class was amazing, and I really wish I still lived in Berkeley so I could take more classes and shop at the store. When it finished, I went out looking for something "easy" and "useful" I could create... and I foolishly ended up picking a tote bag - Butterick's B5006. With 9 exterior pockets and everything lined, it's ambitious for a beginner and I didn't know what I was getting myself into.

I actually did quite well, all things considered. The thing that derailed me was really silly - the velcro closure. I was afraid to sew velcro on, couldn't find the right type, ended up getting some and then let the project lay untouched for almost two years. I came across it this weekend while looking for something to sew and finished it within a few hours.

It makes me laugh looking back at the bag now. The tension on my machine was so terrible! At the time, I barely knew was tension was, just that sometimes my machine seemed to work better than others. A few of the pockets are barely on there (such loose tension!) and will probably need to be hand-reinforced at some point. I actually should have done that before sewing in the lining, whoops.

polkadots! and puckering...

The bag makes copious use of interfacing, too. My current interfacing skills are clearly still at the same level they were when I started. Luckily, it's a little harder to notice the puckering and bubbling because the print is patterned and there are so many layers of pockets on top. I did some research on interfacing and now have some tips for the next time I have to use it:
  • Don't move your iron when you are fusing. Even though it is more fun. There is a big difference between "pressing" and "ironing" and I need to remember that.
  • A damp pressing cloth helps a lot.
  • Don't be impatient! You really do have to leave the iron on the fabric and --press hard-- while "pressing" for the amount of time it tells you to. It does take forever and you can't rush it.
  • Match your interfacing weight to the weight of the fabric.
  • If all else fails, and you don't mind something a little less stiff/bonded and having to sew through multiple layers, sew-able interfacing works too.
I picked up a couple other bag patterns since I'm still a little intimidated to try clothing. I will conquer interfacing. I'm making it my mission. I also upgraded my iron, which should help.

Anyway.

The velcro looks pretty terrible too. I totally should have used the massive velcro I got for my laptop sleeve. The velcro I bought years ago was iron-on. At the time, I thought it would be easier, but the instructions call for actually ironing - not pressing - the velcro on. And since the whole bag is covered in fusible interfacing, that's a recipe for disaster. And, for some reason, I got this weird velcro that was already broken into half inch squares - I hope not by choice, I'm going with the benefit of the doubt and saying that I had no idea it was like that. But, I just went with it. It looks terrible. Thanks Past Ally. Future Ally has learned her lesson.

Overall though, the bag looks good, and I'm happy to have finally finished that project. My other long outstanding sewing project, my quilt, is in the home stretch too, but quilting is another intimidating challenge. To be continued...

Sunday, October 23, 2011

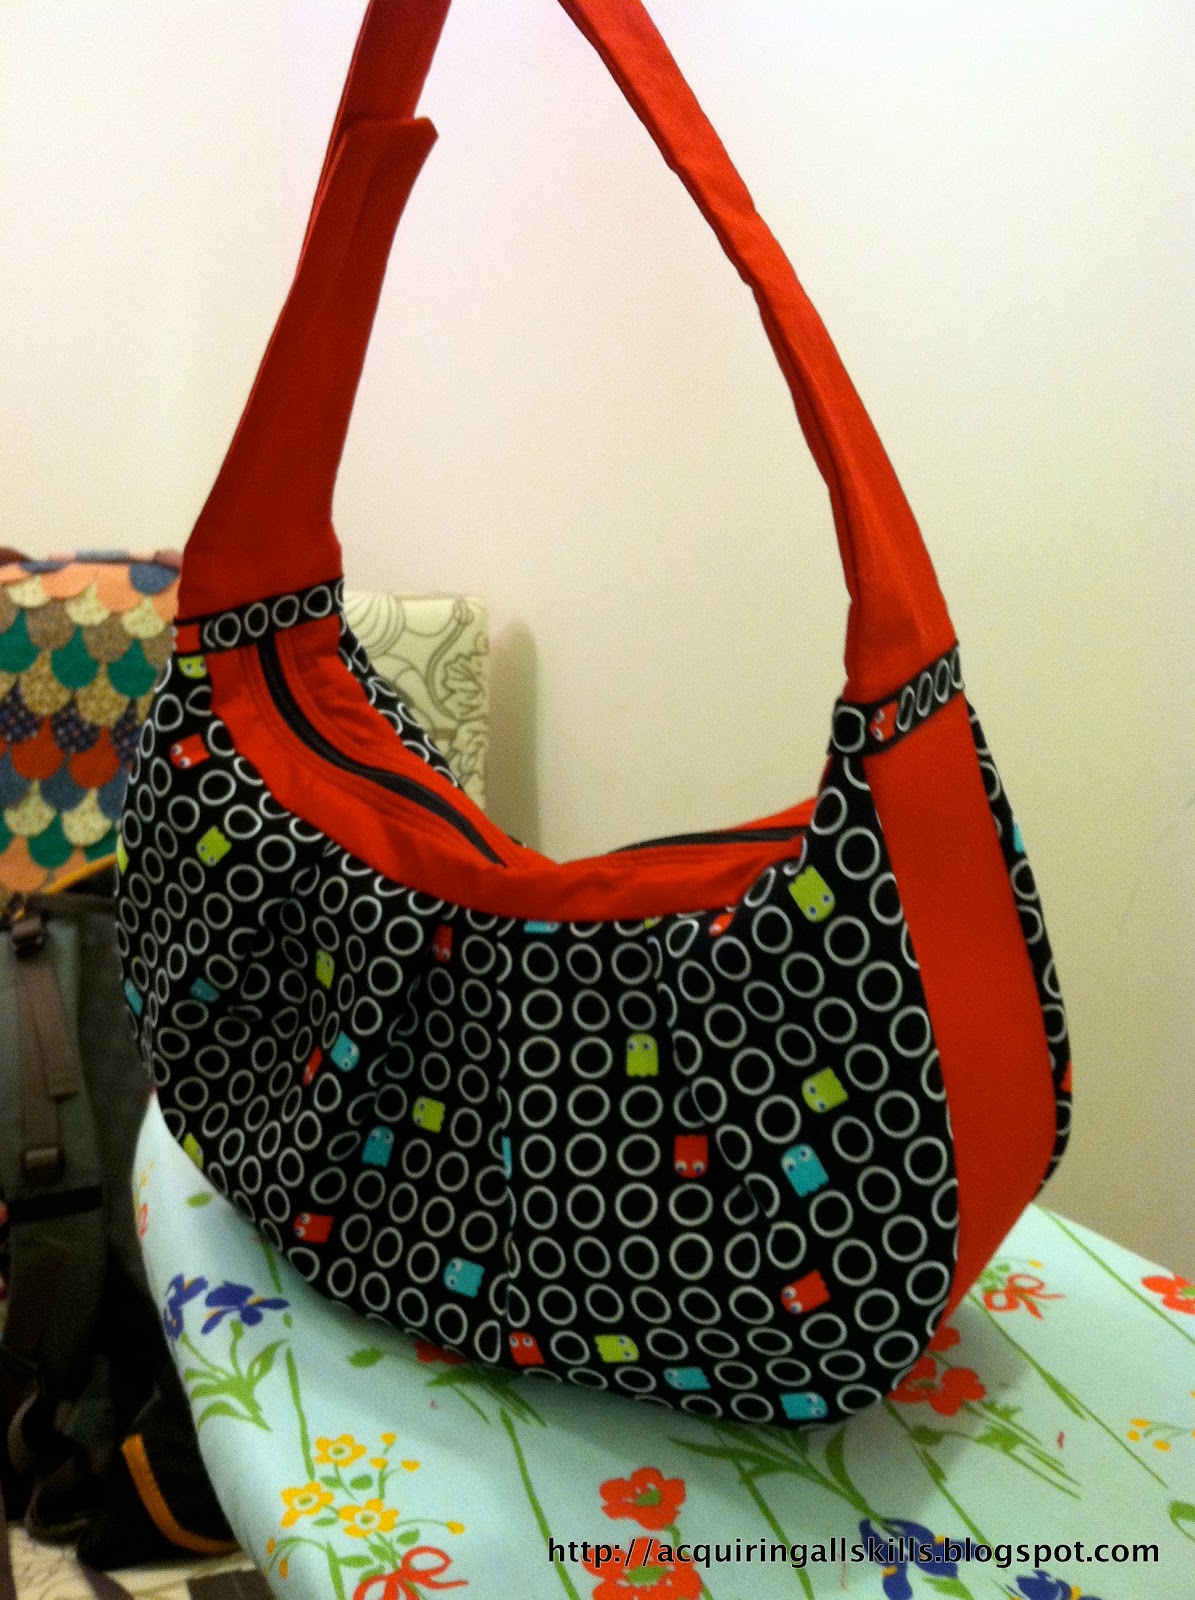
Pacman Ghost Bag

A local fabric store unexpectedly has a very small video game fabric section. Even though I don't play video games, I like the style of the old school animation - it's often pixelated so it works well with cross stitch. I was so incredibly charmed by the Space Invader and Pacman fabrics that I bought a half yard of each, breaking my rule of never buying fabric without a project in mind.


 The only thing I could think of doing with them was making a quilted iPhone/computer case. But then I came across a patten for a bag that required only a 1/2 yard of printed fabric (along with other yardage for contrast and lining fabrics) and decided to jump on it. So, I present, my Pacman bag:


The pattern I used was McCall's M6045. This is the first bag I ever made, and it took me about 2.5 days to complete, working pretty hard on it. I've been sick the past week and it's been incredibly frustrating not to be able to climb and function normally - this project kept me sane.

Additionally, it also drove me insane. This bag was a project full of so many surprises. I didn't realize the bag would be so big, I didn't realize I would need three different types of interfacing, I could not believe my sewing machine could sew through that many layers at once without breaking, and I had to do some pretty fancy maneuvers so sew some of those curves. Plus, this is the first time I've ever sewn in a zipper. It was a little ambitious. This is what happens when you don't read the instructions before starting a project!

I learned a lot though:
  • Every time I sew from a pattern and not from scratch, I'm amazed how many ways you can hide seams. In linings, with edging (I made a kind of edging/bias tape for the inside!), sewing other layers on top of messy seams. I don't know why this always surprises me, but it does.
  • I love fusible fleece. It gives a really nice soft dimension to everything.
  • You should never ever use a highly contrastive thread for visible stitches without good reason. And if you do, you need to make sure you can stitch perfectly.
  • It's really important to transfer all the markings on the pattern, no matter how tedious it is. Otherwise, if you wing it, things may not fit together at the end (*ahem ahem handles*) and then you have to go back and alter the pattern.
One thing I can't seem to get a handle on is fusible interfacing. Fusible adhesive = amazing. Fusible interfacing = always looking terrible. It could be that I'm buying the wrong kinds or maybe I'm not applying it right, but it's so gross looking. Case in point (I squished it a little to emphasize the wrinkles):


I'm staying far far away from that until someone can tell me what I'm doing wrong.

Small detail that I really liked: Pacman buttons! At first I thought buttons on the bag would look dorky, but then I gave it a shot and now know how to make buttons. Cute!


Detail that I butchered but still really like: edging. I had no idea how the thick seam on the inside would be finished and didn't really get it until I actually started sewing this on. I did a pretty poor job, but am still amazed it's functional - this was by far the hardest part, except maybe the handles...

Detail that I butchered/couldn't do and had to come up with a way to hide: the handle seam. I have no idea how this can be done in an attractive way. The handles basically are hollow, and hide all the junk/messy seams from the edges of the zipper and "gusset" of the bag. I amazingly got them attached despite getting repeated errors from my sewing machine (maybe from sewing over the zipper? not sure) but it looked so horrendous that I improvised by gluing a makeshift ribbon of ghosts over my catastrophic stitching. Now it just looks confusing. But it's a 1000% improvement.

Maybe I should have stuck to ghost oven mitts?